Showing posts with label Build Tips. Show all posts

Thursday, 8 January 2015

Soldering Station Conversion

Sentimental Issues

Back in my Uni days, I bought what I thought was a pretty sweet soldering station - the Micron W/2172.   If I remember right it cost about 4 weeks worth of part time wages, and I think it was worth it - it's lasted about 20 years so far.

But, there are issues.  I can't find a supply of new tips for it, and the last good tip is a conical one.  So it was put away in the cupboard and I upgraded to a Hakko 396 station.

Then I got to thinking... both stations used a 24V supply to heat their irons, so how hard would it be to graft a 907 handle into the Micron station?  It would also be handy - I could load the Micron station with a big chisel tip for when you need a lot of thermal mass, standardise on one set of spares for both stations, and avoid having to swap tips on my Hakko all the time. WIN!

Will It Work?

There is a lot of information out there about the Hakko 907 handle, and this topic on the EEVBlog forum  was exceptionally helpful.  The important point to take away is that the 907 handle uses a thermistor to measure it's temperature.

If the Micron does the same, it should be a simple mod.

Take it Apart!

So, I whipped to cover off and started to take a look.


Friday, 5 December 2014

Improved Current Load

Some Free Advice!

(Update - July 2019 - see the end of this post regards how not to blow this up!).

Back when I wrote about my failure to build a current limiting circuit for my Alarm Panel Interface, Zega was kind enough to offer me some advice.

Long story short, half the oscillations I was chasing in my limiting circuit were due to my quick and dirty Constant Current Load.  


Here's the Problem...

Saturday, 26 July 2014

Isolation Options


Isolated PSU


So if you find out you need to isolate your circuit, you will need to power it over the isolation barrier, and there are options out there to do that.

Finding myself in that position, and being a notorious tight-arse I started to look at DIY options.

Tuesday, 8 July 2014

10 Years On

DIY Trailer LED Lights


About 10 years ago I built a pair of LED trailer lamps for my Father In Law. This was back when LED lights were stupidly expensive - and as luck would have it I had access to some high brightness samples. 

Anyway, the lights served their time in the harsh conditions of the Riverland and the plastic lenses finally turned more opaque than useful. 

After replacing with a set of lamps off eBay for less than $40 I thought I'd share what they look like now. 


Monday, 30 June 2014

More on Alarm Panel Interfacing

I've Been Busy...

I haven't had the chance to update things for a while, but for those interested, I'd like to share some build pictures of my Alarm Interface.  And yes, it's working and in service, with a nice programming GUI. (Links at the end - code will be up "soon").


Teaser Render!

Measure Twice, Cut Once, Get a New Ruler....

History Repeats

With past projects, I've made some mistakes that are common to a lot of projects.  Who hasn't mixed up D+ and D- on a 485 driver?

One thing I've added to my workflow is using excel to help build my new packages.  In Altium you can copy pin information from a pdf into a table, massage it as needed and then pate it onto Altium.  I've configured 100 pin devices like this in a lot less time it would take to edit them one by one.

Tuesday, 10 December 2013

Best Case for the Job

Prototype Follow Up

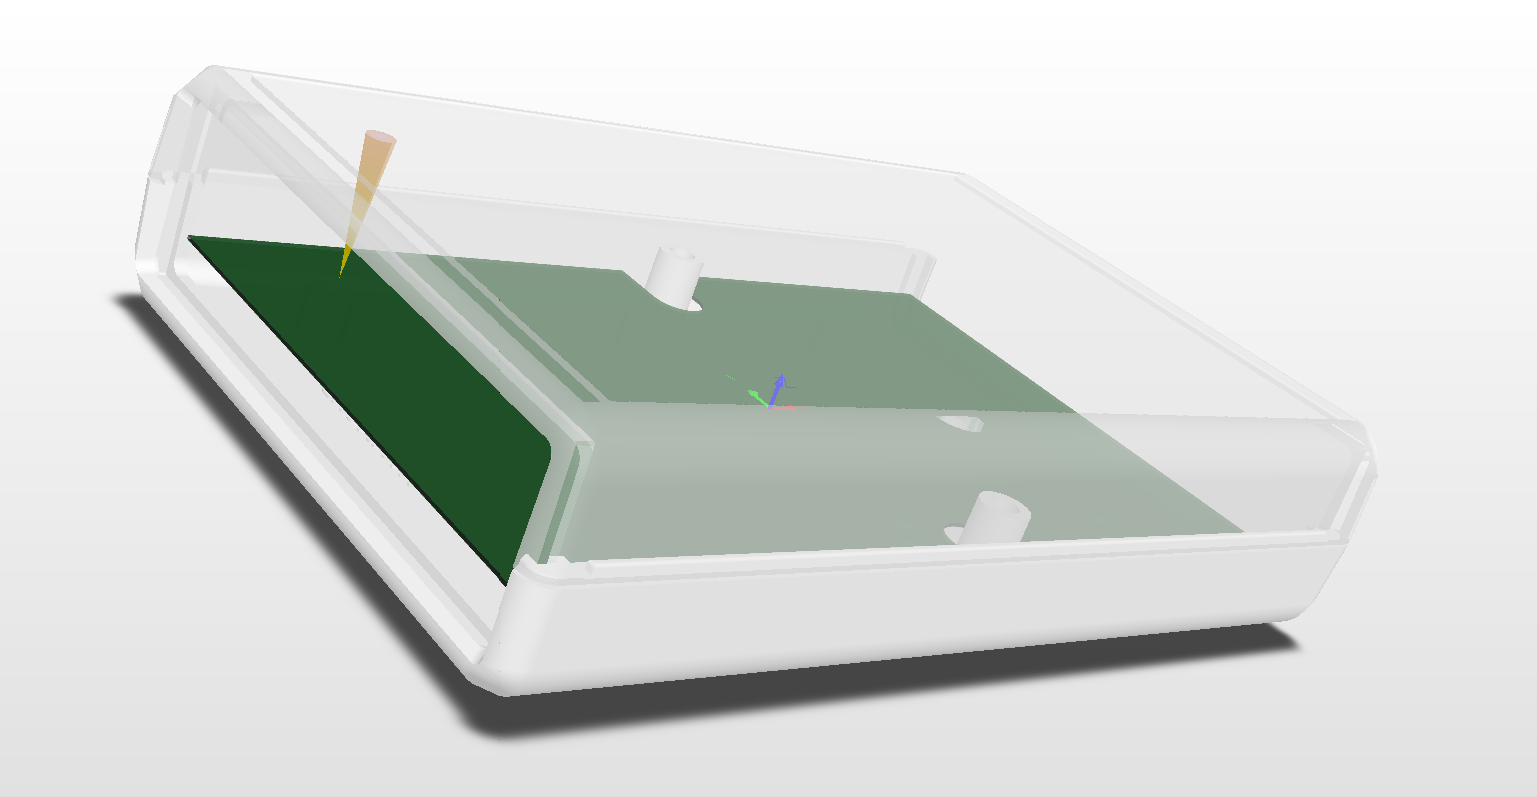
I love the range of cases from Hammond Manufacturing. The only draw back with these cases is that in one off quantities, they are expensive.

What I love about the Hammond cases is that Hammond supply excellent 3D cad models of all their products, a you can use these to help created great looking project mock ups before you spend a cent.


Hammond 1593NBK Step Model in Altium

Tuesday, 6 August 2013

Design and Test, The Third

Filter Testing and Options

IN THEORY

In my previous posts, I'd debugged my power supply, and got my Arduino Leonardo clone up and running.

I'm getting closer to finishing but there's still one functional block that I'd not yet tested and it's my active filter.  Again, a big hat's off to Lior for the inspiration behind my build, but I have done some things my own way.

For example I used a Sallen-Key low pass active filter to get a 1.5kHz Low Pass Filter.

Thanks to the internet, rather than hand crank the numbers, I used this on-line calculator from OKAWA Electric Design. From that design I whipped up this LT-Spice File.


LT-Spice Circuit (Active Filter)

Design and Test, Part Two

Testing Day Two

As mentioned before, I'd tested and debugged my hardware to the point where it's time to start integrating the systems.  Or in other words get the micro talking to the rest of the board.
Notice Something Strange?

Friday, 26 July 2013

Design and Test

Testing, Day One.

It's been a while (a large part was waiting on parts - I'm looking at you Futurelec!) since I posted about my Alarm Monitoring system but as I've finally been able to get some build and test underway I thought I'd share the progress.  Which is a nice way of saying I'm not finished yet.

Step By Step

With this design I've incorporated a fair few new circuit blocks I haven't tried before, being:

  1. FET Current Limiter Circuit
  2. 4V, 3A (TWELVE WATTS BABY!) Switch Mode power supply
  3. AVR microcontroller (yes, never used 'em before)
So to start, I loaded only the power supply section before placing other parts.  This is a good practice when prototyping as if you stuffed something up, you don't blow up the rest of your board.  I've actually designed in zero ohm links on the power supply rails which could also prevent the same destruction but through experience I prefer to do it his way.

Zero ohm links are good for when you are setting up production boards.  You can adjust anything that needs adjusting in isolation before installing the links.

But for prototypes - Why load everything on your first prototype when a SNAFU in any area could make the whole exercise pointless?


Partially Loaded

Tuesday, 11 June 2013

Stencil Success!

So I'd managed to knock up a pair of solder paste stencils, and now it's time for the moment of truth:  can I actually manage to lay down pastes and successfully solder some parts on?

Plastic Not-So Fantastic

In my last past, I made mention that I'd only intended to test the plastic stencil if the metal one failed.  Well, I got in-touch with my inner feminist and decided to start with the plastic stencil after all.  Why?  Well, the plastic sat flush with the boards, and I was thinking I'd probably not need the top frame in my Jig.


Sitting Pretty

Tuesday, 4 June 2013

Stencil Mania

Living in Australia....

...has a whole load of advantages, but one thing that sucks is that we are far from everyone else.  So once I've ordered my parts, I have to wait a while for the bits to arrive.  

And that usually gets me thinking.  Well, reading articles on the internet is kind of like thinking....

DAMN FINE DIY

There are some pretty talented and smart people out there, and I've recently read about some examples of DIY Solder Paste stencils.  Both of these guys have achieved some pretty impressive results, and with my upcoming projects, I started to think that the use of solder stencils might just save me some time.  

While I can hand solder SMD parts, and when set up I've been able to knock off over 100 parts an hour, it's bloody fatiguing.  Plus I have this hot air tool I picked up from eBay that I haven't tried yet either... so I began to hatch a plan.

However, rather than muck around with etching and all the drama that comes with using chemicals (e.g. negative WAF) I thought I'd give it a shot milling out a stencil at work.

Sunday, 2 June 2013

Double or Nothing!

Double or Nothing!

As I talked about last time, in my last Seeed order I organised multiple designs in the one PCB service.  In this blog I want to let you know how I went from this:


Two for One

To This!


 Separated

Monday, 20 May 2013

Seeed-ing. And Not the Bit-torrent Kind.

IMPRESSIVE!


That's my opinion regards Seeed studio and their PCB Fusion service.

As I mentioned in a past post I've been working on a new project, and I've ordered the boards from Seeed. In fact, as I'm a tightarse (is it an just an Aussie thing?), I waited until I had a few projects to order.  You see, if you just order one $25 project, it costs you an extra $40 in shipping, but with Seeed you get *free* shipping for orders over $50 - and it's registered Air-mail shipping too.

So that's the first big plus.

Saturday, 30 March 2013

Basic Protection

BASIC PROTECTION

For a recent project I'm working on, I wanted to add some basic IO protection.  The requirements for this were:

  • As usual, it had to be cheap
  • It had to be bi-directional.  The pin to protect was configurable as either input or output.
  • Provide short circuit protection
  • Provide over-volt protection
  • Provide reverse bias protection
  • It also has to be cheap

Monday, 18 March 2013

Missed it by *that* much...

I've always loved Get Smart.  I always felt just a little bit sorry for Max, when he'd try so hard and *just* miss out... but then you'd cheer when it all came together for him in the end.

It's a bit like how I feel about Tag Connect.